
The first time I pulled a tray of perfectly golden air fryer rice balls out of the basket, I realized I had found the ultimate crispy side dish. As a chef who spent years navigating professional kitchens, I know that texture is everything, and these rice balls deliver that restaurant-quality crunch without the heavy grease of traditional deep frying.
Essential Ingredients and Tools for Perfect Air Fryer Rice Balls
To achieve the perfect structure, you need cold, day-old jasmine or short-grain rice. The starches have set, which prevents the balls from becoming mushy during the air frying process. This is the foundation of an excellent leftover rice recipe.
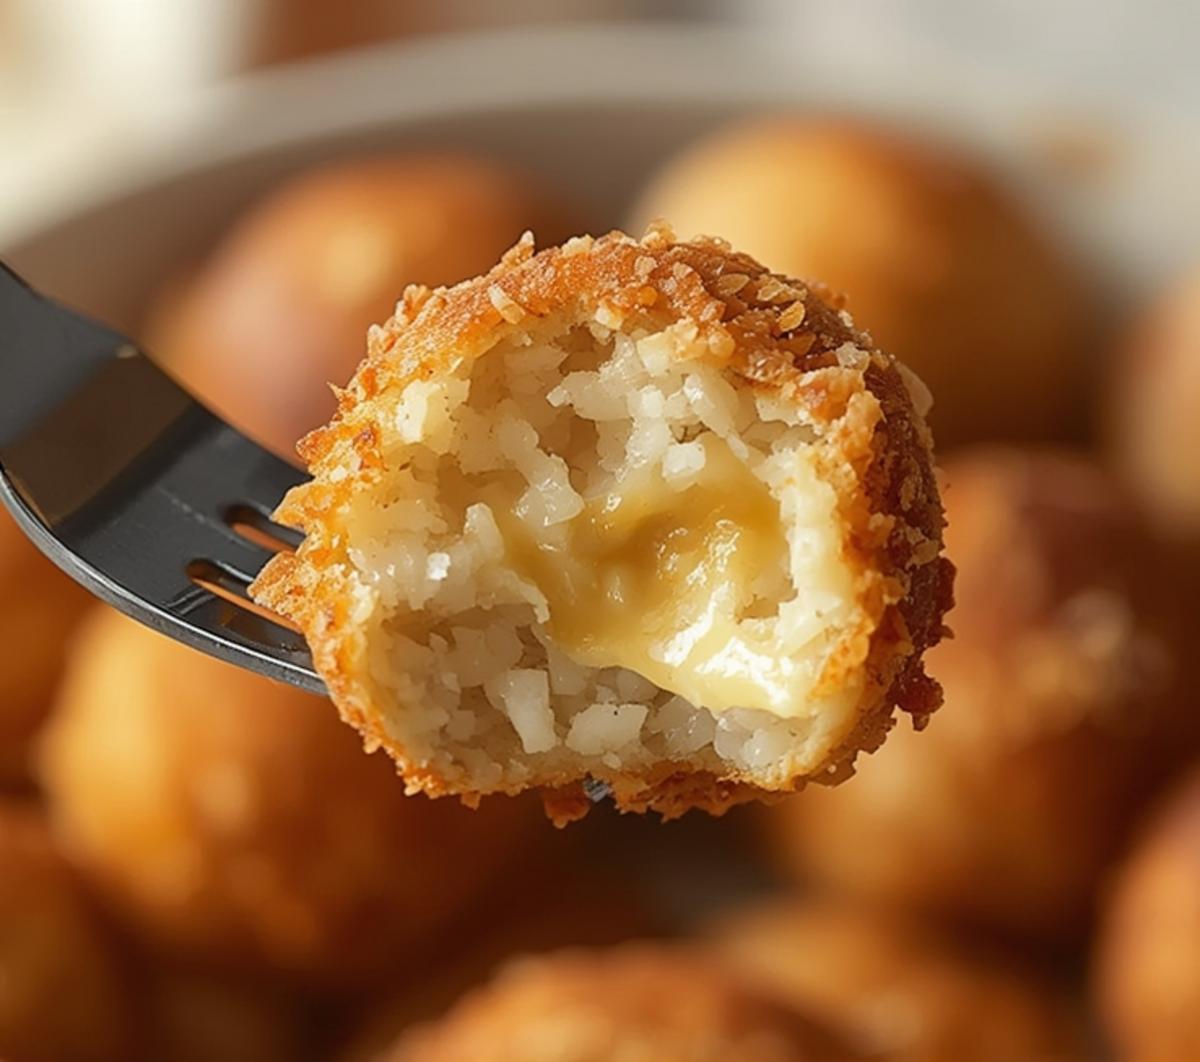
We bind the rice with a whisked egg and a touch of cornstarch to ensure the spheres hold their shape under intense heat. Seasoned panko breadcrumbs create the outer shell, while a light coating of olive oil spray helps conduct heat evenly for maximum crunch. This combination creates the signature golden rice balls we are aiming for.
For tools, a sturdy ice cream scoop or a small cookie scoop is essential for uniform sizing. A silicone brush helps apply oil evenly without over-saturating the breading. Having an instant-read thermometer on hand allows you to verify the internal temperature, ensuring the center is steaming hot.
The air fryer itself is the most critical tool. I rely on my precision temperature control to mimic the convection ovens found in professional pastry shops. A non-stick basket or a sheet of parchment paper designed for air fryers prevents sticking and makes cleanup effortless.
Quick Prep and Cook Time for Air Fryer Rice Balls
Preparation for this recipe takes approximately 15 minutes, allowing time to mix the binders and coat the rice spheres. This stage is about organization and assembly, ensuring every ball is evenly coated before it hits the heat.
The cook time is just 10 to 12 minutes at 375°F (190°C). During this phase, the hot air circulates rapidly, evaporating surface moisture and expanding the panko crumbs into a rigid, crunchy shell.
A major time-saving tip is to scoop and bread all the rice balls while the air fryer preheats. This workflow minimizes downtime and gets these easy air fryer snacks on the table faster. You can serve these air fryer rice balls as a standalone appetizer or pair them with a dipping sauce for a complete side dish recipes experience.
Step-by-Step Guide to Making Crispy Air Fryer Rice Balls
Start by preheating your air fryer to 375°F (190°C). Preheating is non-negotiable in professional cooking; it ensures immediate searing and prevents the breading from absorbing excess oil before it crisps up.
In a mixing bowl, combine your cold leftover rice with the egg, cheese, and seasonings. Use your hands to mix thoroughly but gently-you want to distribute the ingredients without crushing the rice grains, which would create a dense texture.
Set up a standard breading station with flour, beaten egg, and seasoned panko breadcrumbs. Roll a portion of the rice mixture into a tight ball, pressing gently to compact it, then dredge it first in flour, dip in egg, and finally roll it in the breadcrumbs until fully covered.
Lightly spray the breaded balls with olive oil spray. This application of fat is minimal but effective; it aids in browning and protects the crust from drying out while the interior heats through.
Arrange the balls in the air fryer basket in a single layer, leaving space between each one. Overcrowding restricts airflow, leading to uneven cooking and soggy spots, so work in batches if necessary.
Cook for 10 to 12 minutes, shaking the basket halfway through the cooking time. The rotation exposes all sides to the heating element, guaranteeing that distinct, all-over crunch.
You will know they are done when the exterior is deep golden brown and feels firm to the touch. An internal temperature of 165°F (74°C) confirms they are safe to eat and perfectly heated.
Why You Will Love These Healthy Air Fryer Rice Balls
The first mention of air fryer rice balls brings to mind the classic Italian arancini, but this method makes them accessible and lighter. You get all the savory satisfaction of a fried appetizer with significantly less oil, making it a guilt-free choice for any meal.
The air fryer excels at creating a rapid convection effect that crisps the exterior while locking in moisture inside the rice. This technology transforms a simple side dish into a gourmet experience, offering speed and texture that rivals deep frying.
These pair wonderfully with a spicy aioli or a simple marinara, fitting seamlessly into your collection of quick sides. They are versatile enough to serve as a snack, a party appetizer, or a companion to your main course.
Creative Variations for Your Air Fryer Rice Balls

I often adapt this recipe based on the season and what is available in the pantry. For a spring variation, I fold in fresh herbs like chives and parsley, which add a brightness that cuts through the richness of the cheese.
For a heartier version suitable for a weeknight dinner, mix in diced cooked ham or pepperoni before forming the balls. This transforms the side dish into a more substantial component of the meal without complicating the cooking process.
You can also experiment with different cheeses. While Parmesan offers a sharp, salty bite, a mild mozzarella provides a gooey center, creating a delightful contrast with the crunchy shell. This adaptability makes air fryer rice balls a favorite in my kitchen.
Common Mistakes to Avoid with Air Fryer Rice Balls
The most frequent error I see is using freshly cooked, warm rice. The steam trapped in the grains makes the mixture too sticky and prone to falling apart in the basket. Always use chilled, day-old rice for the best structural integrity.
Another mistake is neglecting to spray the breaded balls with oil. While the air fryer is efficient, a light mist is necessary to achieve that deep golden hue. Skipping this step often results in a pale, dry crust that lacks the satisfying snap of a true fried texture.
Finally, avoid overcrowding the basket. The science of air frying relies on unobstructed airflow. If the balls are touching, they will steam rather than roast, ruining the crispy texture you worked hard to achieve. Patience and batching are key to perfect air fryer rice balls.
How to Store and Reheat Air Fryer Rice Balls
Once cooled, store any leftovers in an airtight container in the refrigerator for up to three days. Separating layers with parchment paper prevents the crumbs from becoming soggy from condensation.
To reheat, return them to the air fryer at 350°F (175°C) for 3 to 4 minutes. This method revives the crispy shell far better than a microwave, which tends to soften the breading.
I organize my site so you can easily find technique guides and temperature references for every recipe. Whether you are looking for a specific leftover rice recipe or general air frying tips, the goal is to provide clear, reliable information that empowers you to cook with confidence.
Enjoy Your Ultimate Crispy Air Fryer Sides Creation
Mastering your air fryer is about understanding heat and airflow, and this recipe is a perfect exercise in those principles. Trust the process, experiment with flavors, and enjoy the crispy results of your air fryer rice balls. Happy Cooking – Chef Marcus.
Nutrition Facts (Per Serving)
Extra Crispy Air Fryer Rice Balls - Golden Crunchy Sides
Equipment
- Air Fryer
- Mixing Bowl
Ingredients
Main Ingredients
- 2 cups cooked rice preferably day-old
- 1 cup shredded mozzarella cheese or cheddar
- 1 large egg beaten
- 0.5 cup breadcrumbs panko for extra crunch
- 1 tsp garlic powder optional seasoning
Instructions
- In a mixing bowl, combine the cooked rice, shredded cheese, beaten egg, and garlic powder until well mixed.
- Form the mixture into small balls, about 1.5 inches in diameter, and roll each ball in breadcrumbs to coat evenly.
- Preheat the air fryer to 375°F and place the rice balls in a single layer in the basket.
- Air fry for 10-12 minutes, shaking halfway, until golden and crispy on the outside.
- Serve immediately as a side or snack, enjoying the crunchy texture.
Frequently Asked Questions
Can I use a different type of rice for these air fryer rice balls?
Yes, you can use leftover white or brown rice, but day-old rice works best for a crispy texture. Avoid freshly cooked rice as it can be too moist and may not hold together well. Adjust the cooking time slightly if using a different rice variety.
How should I store leftover air fryer rice balls?
Store them in an airtight container in the refrigerator for up to 3 days. For best results, reheat them directly in the air fryer to restore their crispiness. Avoid storing at room temperature for extended periods.
Can I make these rice balls ahead of time?
Yes, you can prepare and shape the rice balls up to a day in advance and store them covered in the refrigerator. When ready to cook, air fry them straight from the fridge for a quick and easy snack. This makes them perfect for meal prep or parties.
What is the best way to reheat these rice balls?
Reheat them in the air fryer at 350°F for 3-5 minutes to bring back the golden crunch. Avoid using a microwave, as it can make them soggy. For a larger batch, you may need to reheat in multiple batches to ensure even crisping.
What are some serving suggestions for these crispy rice balls?
Serve them as a side dish with grilled chicken or as a snack with dipping sauces like sriracha mayo or sweet chili. They also pair well with salads for a balanced meal. For a party, arrange them on a platter with toothpicks for easy finger food.
Have more questions? Leave a comment below and we will help you out!